
What Motor Tuning Does in Mach3
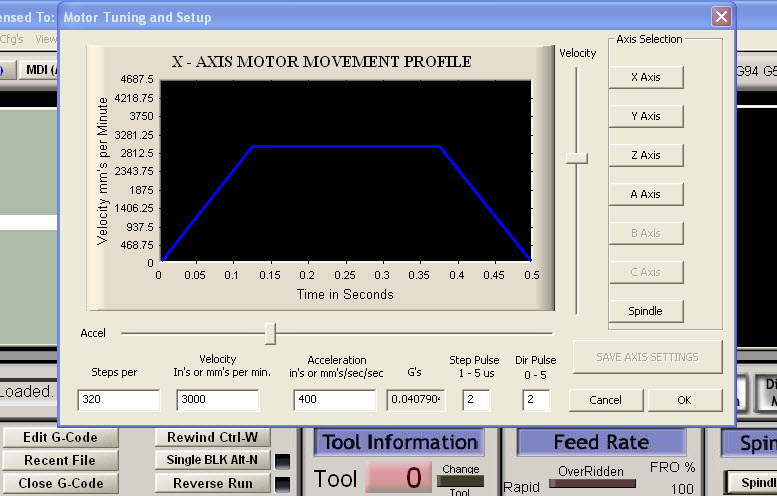
Motor tuning in Mach3 comes down to three numbers per axis: steps per unit, velocity, and acceleration. You set them under Config → Motor Tuning, one axis at a time. Get them right and the machine moves the distance you command, as fast as its mechanics allow, without losing position.
The default values in a fresh Mach3 installation are not matched to any particular machine. Steps per unit will almost certainly be wrong, so parts come out the wrong size. Velocity and acceleration are usually either too timid, which wastes time on every job, or too aggressive, which causes lost steps.
Lost steps are the real danger. A stepper motor that skips does not raise an error. Mach3 still believes the axis is where it should be, and the mistake only shows up later as a part that is subtly wrong. Tuning is how you find the limit and then stay safely below it.
Before You Start
Collect four facts for each axis before opening the dialog:
- Motor steps per revolution. Most stepper motors are 1.8° per step, which is 200 full steps per revolution.
- Driver microstep setting. Read it from the DIP switches on the driver, for example 8 or 16.
- Drive mechanism. For a screw, the lead in mm per revolution. For a belt or rack, the pulley or pinion size, plus any gear reduction.
- Native units. Check Config → Select Native Units and decide on mm or inches. Every number that follows depends on this choice.
Also make sure the axis can travel freely and that the emergency stop works. You will be running the axis close to its limits.
How to Calculate Steps per Unit
Steps per unit tells Mach3 how many step pulses move the axis by one millimetre or one inch. The formula is:
Steps per unit = (motor steps per revolution × microsteps × gear ratio) ÷ travel per revolution
The same method is described in the official Mach3 setup documentation.
Travel per revolution depends on the drive:
- Lead screw or ball screw: the screw lead, for example 5 mm.
- Belt: pulley teeth × belt pitch. A 20-tooth GT2 pulley moves 20 × 2 mm = 40 mm.
- Rack and pinion: pinion pitch diameter × 3.1416.
A worked example: a 200-step motor on a driver set to 8 microsteps, coupled directly to a 5 mm lead ball screw, gives (200 × 8 × 1) ÷ 5 = 320 steps per mm.
In inches, the same motor and driver on a 5 TPI screw (0.2 in of travel per revolution) gives (200 × 8) ÷ 0.2 = 8,000 steps per inch.
Common combinations for a 200-step motor with no gear reduction:
| Drive | Microsteps | Steps per mm |
| 5 mm lead screw | 8 | 320 |
| 5 mm lead screw | 16 | 640 |
| 8 mm lead screw | 8 | 200 |
| 10 mm lead screw | 8 | 160 |
| GT2 belt, 20-tooth pulley | 8 | 40 |
| GT2 belt, 20-tooth pulley | 16 | 80 |
Type the result into the Steps per box in the lower left of the Motor Tuning dialog, then click Save Axis Settings before selecting another axis. If you switch axes without saving, the value is lost.
Verify Steps per Unit by Measuring
A calculated value is a starting point, because real screws, belts, and pulleys carry small errors. Confirm it with a measurement:
- Jog the axis to a known position and zero it.
- Command a long move, for example G0 X100. Longer moves give a more accurate correction.
- Measure the actual travel with a dial indicator, calipers, or a steel rule.
- Correct the value with this formula:
New steps per unit = old steps per unit × commanded distance ÷ measured distance
If you commanded 100 mm with 320 steps per mm and the axis moved 99.2 mm, the corrected value is 320 × 100 ÷ 99.2 = 322.58.
Mach3 can do this arithmetic for you. On the Settings screen (Alt-6), the Set Steps per Unit button asks for the commanded and measured distances and writes the new value. Repeat the test once to confirm the result.
Finding Maximum Velocity
Velocity in Mach3 is the top rapid speed of the axis, in units per minute. Find the limit by testing, then back away from it.
- Start low. Around 1,000 mm/min (40 in/min) with a gentle acceleration is a safe first value on most small machines.
- With the Motor Tuning dialog open, hold the up and down arrow keys to run the axis back and forth.
- Raise velocity in steps of 10 to 20 percent and test again each time.
- Stop when the motor stalls, whines without turning, or sounds rough. That is the limit.
- Set the final value 20 to 30 percent below that point and save.
The margin matters. A motor that just manages a rapid move in free air has no torque left for cutting forces, a cold morning, or a slightly dry screw.
The kernel speed ceiling
Mach3 can only send a limited number of pulses per second, set under Config → Ports and Pins → Kernel Speed. The default is 25,000 Hz. That caps velocity regardless of what the motor can do:
Maximum velocity (units/min) = kernel speed × 60 ÷ steps per unit
At 25,000 Hz and 320 steps per mm, the ceiling is 25,000 × 60 ÷ 320 = 4,687 mm/min. At 640 steps per mm it halves to 2,343 mm/min. If you hit this ceiling before the motor stalls, lower the microstep setting on the driver rather than raising kernel speed on an older PC.
If the control PC itself is the bottleneck, see our notes on upgrading an older CNC controller.
Setting Acceleration
Acceleration, in units per second squared, controls how quickly the axis reaches its top speed. It affects cycle time more than velocity does on parts with many short moves, because the axis rarely reaches full speed.
- Keep the velocity you just settled on.
- Raise acceleration in steps and run short back-and-forth moves that reverse direction often.
- Listen for a knock or a missed start at each reversal, which signals a lost step.
- Back off 20 to 30 percent from the first sign of trouble and save.
Then prove it. Zero the axis against a dial indicator, run a program of 20 or more rapid reversals, and return to zero. Any offset on the indicator means steps were lost, so reduce acceleration and repeat.
Tune each axis separately. The Z axis usually needs lower values than X and Y because it lifts the weight of the spindle. A gantry axis carrying the most mass will also accelerate more slowly than a light one.
Step Pulse and Dir Pulse
The Motor Tuning dialog also has Step Pulse and Dir Pulse fields, each accepting 1 to 5 microseconds. They set how long each signal is held so the driver can read it reliably.
Leave them at the defaults unless the motor runs rough or misses steps at every speed. In that case, look up the minimum pulse width in the driver’s datasheet and raise the values to match. Slow optocoupler inputs on older or low-cost drivers are the usual reason to increase them.
Motor Current Is Set on the Driver, Not in Mach3
Mach3 has no current setting. Current is set on the stepper driver, normally with DIP switches and a table printed on the case.
- Match the motor’s rated current per phase. That figure is on the motor label or datasheet.
- Check whether the driver table shows peak or RMS current. Peak is about 1.4 times RMS, so confusing the two means running the motor well under or over its rating.
- Too little current costs torque. The motor stalls under load or loses steps in heavier cuts.
- Too much current overheats the motor and driver and shortens their life.
- Use the half-current idle switch if the driver has one. It reduces heat while the axis is standing still.
Set current before tuning velocity and acceleration. Changing it afterwards changes the available torque, so the limits you found no longer apply.
Worked Example: Tuning One Axis
Here is how the numbers come together for one axis: a 200-step motor, a driver set to 8 microsteps, a 5 mm lead ball screw, and the default 25,000 Hz kernel speed. The stall and lost-step figures are illustrative. Yours come from testing your own machine.
| Step | Result |
| Calculate steps per mm | 200 × 8 ÷ 5 = 320 |
| Command 100 mm, measure 99.2 mm | 320 × 100 ÷ 99.2 = 322.58 |
| Kernel speed ceiling | 25,000 × 60 ÷ 322.58 = 4,650 mm/min |
| Motor stalls at 4,000 mm/min in testing | Set velocity to 3,000 mm/min |
| Lost steps appear at 600 mm/s² | Set acceleration to 450 mm/s² |
The motor ran out of torque before the kernel ceiling was reached, so the motor is the limit here. Both final values sit 25 percent below the point where trouble started.
Common Problems
| Symptom | Likely cause | Fix |
| Parts are consistently too large or too small | Steps per unit is wrong | Measure and correct with the formula above |
| Motor hums or whines but does not turn | Velocity above what the motor can reach, or wiring fault | Lower velocity, then check phase wiring |
| Position drifts over a long job | Acceleration too high, causing lost steps | Reduce acceleration and rerun the reversal test |
| Rough running at every speed | Step pulse too short for the driver | Increase Step Pulse to the driver’s minimum |
| Settings gone after restart | Axis not saved | Click Save Axis Settings for each axis, then OK |
| Motor very hot at rest | Current set too high, no idle reduction | Check the current table and enable half-current |
If a problem survives all of this, the cause is usually mechanical or electrical rather than a tuning value. Our guide to troubleshooting and calibration covers binding, backlash, and signal noise.
FAQ
What are good starting values for Mach3 motor tuning? There is no universal answer, because the limits depend on the motors, drive, and moving mass. Start low, around 1,000 mm/min and 100 mm/s², and work upward by testing.
Do I need to retune after changing the microstep setting? Yes. Steps per unit changes in direct proportion, so recalculate it. Then recheck velocity against the kernel speed ceiling.
Should every axis have the same settings? No. Each axis has its own screw, load, and friction. Tune them one at a time and expect Z to be slower.
Does this apply to servo motors? Steps per unit is calculated the same way, using encoder counts and the drive’s electronic gearing in place of motor steps. The servo loop itself is tuned in the drive, not in Mach3.
Why does my machine lose steps only while cutting? Rapids in free air need less torque than a cut. If the tuning was set at the edge of stalling, cutting forces push it over. Add margin or lower the feed.
Need Help Tuning Your Machine?
RunTechEngineer tunes steps per unit, velocity, acceleration, and driver current to each machine’s actual mechanical limits. See our Mach3 CNC controller services, including custom macros and screen sets, and our Mach3 setup guide, or contact us to get your machine tuned.
Pingback: Stepper vs Servo Motor for CNC Machines | RunTechEngineer