The best infill for strength is usually gyroid or cubic at 25–40%, but the pattern matters less than most guides suggest. In a controlled tensile study, changing the pattern moved strength by less than 5%. Adding walls, raising density and orienting the part correctly changed it far more. This guide covers what the test data shows and the settings we start from for each kind of part.
The Short Answer
- For most functional parts: 4 walls, 5 top and bottom layers, and 25–40% gyroid or cubic infill.
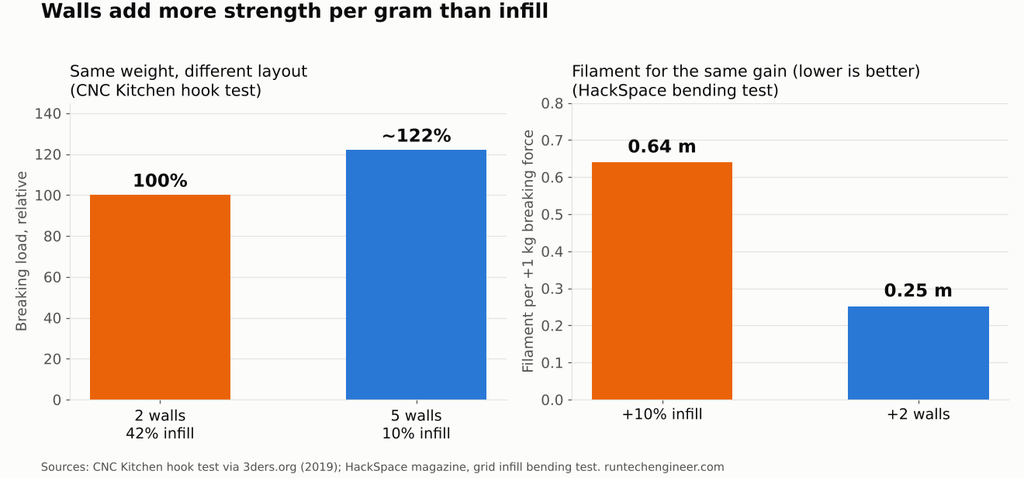
- Add walls before infill. In a CNC Kitchen test, a hook with 5 perimeters and 10% infill was about 22% stronger than a hook of the same weight with 2 perimeters and 42% infill.
- For maximum strength in a small part, use 100% infill. A 100% rectilinear ABS specimen reached a tensile strength within about 1% of the raw material.
- Orientation can outweigh all of these. PLA pulled across its layers held about half the strength of PLA pulled along them.
What Actually Controls Strength
A printed part has three zones, and each one is a separate slicer setting:
- Walls (perimeters): the loops that trace the outline of every layer.
- Top and bottom layers: the solid skins that close the part.
- Infill: the sparse fill inside, set by pattern and density (percentage).
Fernandez-Vicente and colleagues tested ABS tensile specimens with different patterns and densities. The pattern changed maximum tensile strength by less than 5%. Density was the main factor, and 100% rectilinear infill gave the best result at 36.4 MPa.
The reason is where the stress goes. In bending and twisting, stress is highest at the outer surface and close to zero at the centre. The walls and skins sit exactly where the stress is highest, while the infill sits near the centre where it carries little. Only in pure tension or compression through the whole section does the infill share the load evenly.
Walls Matter More Than Infill
Because the outer shell carries most of the load, extra walls usually buy more strength per gram than extra infill. Two independent tests point the same way:
- CNC Kitchen hook test: two hooks of equal weight, one with 2 perimeters and 42% infill, one with 5 perimeters and 10% infill. The perimeter-heavy hook was about 22% stronger.
- HackSpace bending test: each extra 10% of grid infill added about 1.5 kg of breaking force and used about 0.96 m of filament. Each two extra perimeters added about 1.67 kg and used only 0.42 m. Per kilogram of extra strength, perimeters needed about 2.5 times less filament.
Wall thickness is the wall count times the line width. With a 0.4 mm nozzle and a 0.45 mm line width, 4 walls give about 1.8 mm. Set walls as a whole number of lines; a thickness that is not a multiple of the line width leaves gaps or thin filler lines.
When only one region carries the load, reinforce that region instead of the whole part. Most slicers let you add a modifier mesh with more walls or 100% infill around a hole, boss or hook. In CNC Kitchen’s Smart Infill test, this approach made a hook about 33% stronger than the strongest control hook of the same weight.
Which Infill Pattern Is Strongest?
There is no single strongest pattern. The ranking depends on the load direction and the density, so choose by how the part is loaded.
| Pattern | Structure | Best for | Notes |
|---|---|---|---|
| Gyroid | 3D curved surface | Loads from several directions, general functional parts | Similar strength in all directions within the infill; slower to slice; use at least 10–15% |
| Cubic | 3D lattice of tilted cubes | General functional parts, loads from the top | Good all-round choice; prints faster than gyroid on most machines |
| Triangles | 2D triangles | Shear and in-plane stiffness | Strength depends on load direction in the layer plane |
| Grid | 2D crossing lines | Compression from the top, fast prints | Simple and quick; weaker in shear than triangles |
| Honeycomb | 2D hexagons | Compression at low density | Not available in every slicer; many direction changes slow the print |
| Lines / rectilinear | Parallel lines, direction alternates each layer | High-density and 100% parts | Most efficient above about 50%; weak at low density |
| Lightning | Branches that support the top skin only | Visual models | Fastest option; not meant for strength |
The ranking also changes with density. A 2025 study of PLA found honeycomb strongest at 20% infill, while triangular and grid patterns performed best at 50%. That is why gyroid and cubic are good defaults: they are never far from the best, whichever way the part is loaded.
No infill pattern fixes the weak bond between layers. Gyroid and cubic spread strength across the infill, but the part is still weaker in the Z direction.
How Much Infill Is Enough?
Strength rises with density, but so do weight, print time and cost. In the HackSpace test the gain was roughly linear: about 1.5 kg of breaking force per extra 10% of infill.
| Infill density | Typical use |
|---|---|
| 0–15% | Display models and visual prototypes |
| 15–25% | Fit-check prototypes, enclosures, light-duty parts |
| 25–50% | Functional parts under moderate load |
| 50–100% | Small, highly loaded parts and parts that must approach datasheet strength |
Material datasheets quote strength at 100% infill, so a sparse part is weaker than the datasheet suggests. Above about 50%, simple line patterns are more efficient than complex ones, and at 100% the pattern hardly matters.
Orientation Beats Any Infill Setting
Layer adhesion is the weak point of every FDM print. In CNC Kitchen’s PLA tests, specimens printed flat reached 63 MPa. Specimens printed upright, pulled across their layers, reached only 31 MPa. Tilting the part to 45° recovered some of the loss, to about 40 MPa.
No infill setting closes a gap that large. Orient the part so the main load runs along the layers, then tune walls and infill. Our guide on how strong PLA is covers the layer-direction numbers in more detail, and PLA vs ABS vs PETG compares how well each material bonds between layers.
Starting Settings by Part Type
These are the settings we start from with a 0.4 mm nozzle and 0.2 mm layers. Treat them as a first print, then test the real part under its real load.
| Part | Walls | Top / bottom layers | Infill |
|---|---|---|---|
| Display model, visual prototype | 2 | 3–4 | 10–15% lightning or grid |
| Fit-check prototype, enclosure | 2–3 | 4 | 15–20% grid or gyroid |
| Bracket, mount, clamp (bending) | 4–5 | 5–6 | 25–40% gyroid or cubic |
| Spacer, foot, standoff (compression) | 3–4 | 5 | 40–60% cubic, grid or honeycomb |
| Small, highly loaded part (gear, latch, clip) | 5 or more | 6 or more | 60–100% lines |
| Flexible TPU part | 2–3 | 4 | 10–30% gyroid or concentric |
Five top and bottom layers at 0.2 mm give a 1 mm skin. In a part that bends, those skins act like the flanges of a beam, so do not cut them to save time.
Infill for Strength FAQ
What is the strongest infill pattern?
There is no single answer. For loads from several directions, gyroid and cubic are the safest choices. For 100% infill, simple lines or rectilinear are just as strong and print faster. In tensile tests, the pattern changed strength by less than 5%.
Is gyroid infill stronger than cubic?
They are close. Gyroid gives more even strength in all directions and handles shear well, while cubic usually prints faster. Either is a good default for functional parts.
Is 100% infill the strongest?
Yes, for absolute strength. A 100% rectilinear specimen reached within about 1% of the raw material’s tensile strength. It also costs the most material and time, so use it only for small or highly loaded parts.
Is 20% infill strong enough?
For enclosures, prototypes and light-duty parts, usually yes, especially with 3 or 4 walls. For brackets and parts that carry real load, start at 25–40% and add walls first.
Should I add more walls or more infill?
Add walls first. At the same weight, a hook with more perimeters was about 22% stronger than one with more infill. Raise infill after that, or use 100% infill locally where the load is concentrated.
Does the infill pattern change print time?
Yes. Lightning is the fastest because it only supports the top surface. Gyroid is slower to slice and often slower to print than grid or cubic.
Need a Printed Part That Has to Carry Load?
RunTechEngineer designs and prints functional 3D printed parts with the orientation, walls and infill chosen for the load the part will see. Contact us with your CAD file or drawing and a description of the load, and we will suggest the material and print settings.