Annealing PLA is a heat treatment: you hold a finished print just above its glass transition temperature so the plastic can partly crystallize, then let it cool slowly. Done well, it lets a PLA part survive heat that would make an untreated part sag.
What it does not do is make PLA dramatically stronger. Independent tests show modest strength gains, no improvement between layers, and shrinkage that can reach several percent. This guide covers what annealing actually changes, which temperatures and times to use, and how to stop the part changing shape in the oven.
Why Annealing Works on PLA
PLA leaves the nozzle hot and cools quickly, so its polymer chains freeze in a mostly disordered (amorphous) state. Above the glass transition, around 55 to 65 °C depending on the grade, the chains can move enough to line up into ordered, crystalline regions. Below the melting point, about 165 to 180 °C, the part still holds its overall shape.
Crystalline regions do not soften at the glass transition the way amorphous ones do. That is the whole benefit: the part stays stiff at temperatures where untreated PLA turns soft. The visible sign is that the print turns cloudy or opaque, because crystals scatter light.
The same movement that lets the chains reorganize also releases the stresses frozen in during printing. That is why annealed parts shrink in some directions and grow in others.
What Annealing Changes, and What It Doesn’t
| Property | Effect of annealing | What the tests show |
|---|---|---|
| Heat resistance | Large improvement | Prusa found heat resistance rose sharply once PLA was annealed at 90 °C or above. A heat-treatable grade lists 75 to 85 °C heat deflection after annealing, against 55 to 59 °C for standard PLA. |
| Tensile strength along the layers | Small to moderate gain | About 7.5% in CNC Kitchen’s test. Academic studies report larger gains, depending on filament and schedule. |
| Strength between layers | No gain, sometimes a loss | CNC Kitchen measured the same layer-adhesion load before and after. A university study found flexural strength across the layers fell 13 to 32%. |
| Impact resistance | No change for standard PLA | Both Prusa and CNC Kitchen found standard PLA as brittle after annealing as before. Heat-treatable grades are the exception. |
| Size and shape | Shrinks in X and Y, grows in Z | From under 1% to about 10%, depending on filament, part shape, and temperature. |
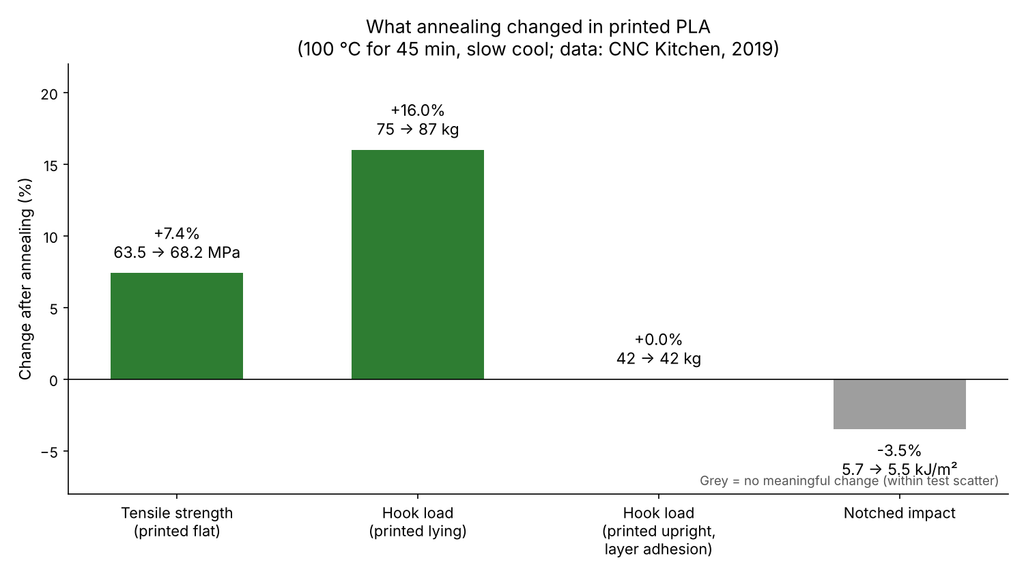
The pattern is clear. Annealing is mainly a heat-resistance treatment. If a part breaks between its layers, annealing will not fix it; change the print orientation instead, as explained in how strong PLA is.
One more limit is easy to miss. Heat deflection is measured under a small load. A 2021 study in MM Science Journal found that under a high enough load, annealed PLA deformed at the same temperature as untreated PLA. A heavily loaded part near 60 °C still needs a different material.
Standard PLA vs Heat-Treatable PLA
Not every PLA responds the same way. Pigments and additives change how fast a filament crystallizes and how much it warps; CNC Kitchen found that colours from one maker warped very differently after the same bake.
Some filaments are made to be annealed. Grades based on NatureWorks Ingeo 3D870, such as 3D-Fuel Pro PLA, are formulated to crystallize when annealed and gain impact strength as well as heat resistance. Protopasta HTPLA is another example. These grades are the better choice when you plan to anneal from the start.
| Filament type | Typical annealing temperature | Typical time | Notes |
|---|---|---|---|
| Standard PLA | 80 to 100 °C | 30 to 45 minutes | Expect visible shrinkage and some warping |
| Heat-treatable PLA (3D870-based) | 110 to 120 °C | About 20 minutes for a 3 mm wall | Longer for thicker parts |
| Protopasta HTPLA | About 110 °C | Up to an hour, until opaque | Maker suggests leaving supports on |
Always start from the temperature on your filament’s datasheet if it gives one.
How to Anneal PLA in an Oven, Step by Step
- Print for annealing. Use 100% infill or close to it; sparse infill lets the walls move. Prusa printed all its annealing samples solid for this reason. Our guide to infill for strength explains the trade-off.
- Leave the part on its print sheet if you can. CNC Kitchen found that keeping parts on a removable steel sheet, with supports still attached, greatly reduced warping.
- Check the oven temperature. A kitchen oven’s dial can be several degrees off, and every degree matters here. Put a separate thermometer where the part will sit, preheat, and let the temperature settle for about ten minutes. Use an electric oven, not a gas one.
- Support the part. Place it on a flat glass, ceramic, or metal tray. For parts that must keep their shape, pack them in fine sand in an oven-safe dish; this holds the part and evens out temperature swings, though it does not stop warping completely.
- Hold at temperature. Time depends on thickness, because the core must reach temperature too. Use 30 to 45 minutes for standard PLA, or the time on the filament datasheet. Packed in sand, allow longer.
- Cool slowly. Switch the oven off and leave the part inside until it reaches room temperature. Taking it out hot invites warping.
- Measure the result. Check that the part has turned cloudy, then measure its critical dimensions.
How to Compensate for Shrinkage
If the part must fit something, measure the change on a test piece and scale the real print to cancel it. Use the same filament, orientation, and oven settings as the final part.
Suppose a 50.0 mm test bar measures 47.5 mm along X and Y after annealing, and its 10.0 mm height grows to 10.2 mm.
scale = design size / annealed size

X and Y:  50.0 / 47.5 = 1.053  -> print at 105.3%
Z:        10.0 / 10.2 = 0.980  -> print at 98.0%
Most slicers let you scale each axis separately. The correction only holds for that filament and that kind of shape: Prusa found parts shrank most along their longest dimension, so a thin plate and a block behave differently. Complex parts with thin walls rarely come out true; when Prusa annealed its own extruder parts, they warped too much to use.
For tolerances on printed parts in general, see 3D printing tolerances.
When to Anneal PLA, and When to Choose Another Filament
Annealing makes sense when:
- The part is simple and chunky, such as a bracket, hook, spacer, or clamp.
- Heat is the main problem, for example a part in a car interior or next to a motor.
- Its dimensions can tolerate a few percent of change, or you can test and compensate.
- You want to keep using PLA because it prints easily and accurately.
Choose a different approach when:
- The part has tight fits, thin walls, or a complex shape.
- It fails between layers or under impact; annealing does not help either.
- It carries a heavy load near 60 °C or above.
- It lives outdoors in sun and weather. ASA handles UV and heat without any post-processing.
PETG and ABS also resist heat better than untreated PLA with no oven step at all. Compare them in PLA vs ABS vs PETG, or use the material selection guide to choose by requirement.
Frequently Asked Questions
What temperature should I anneal PLA at?
For standard PLA, 80 to 100 °C is the usual range; Prusa and CNC Kitchen both saw clear heat-resistance gains from 90 to 100 °C. Heat-treatable grades based on Ingeo 3D870 are annealed at 110 to 120 °C. At 160 to 170 °C, standard PLA collapses.
How long does it take to anneal PLA?
Typically 20 to 45 minutes at temperature, plus slow cooling in the oven. Thicker parts need longer, because the inside must reach the annealing temperature too.
Does annealing make PLA stronger?
Slightly along the layers, by around 7 to 16% in CNC Kitchen’s tests, and not at all between the layers. The real gain is heat resistance, not strength.
How much does PLA shrink when annealed?
It varies from under 1% to about 10%. Parts usually shrink in X and Y and grow in Z. Print a test piece, measure it, and scale the final print to compensate.
Can you anneal PLA in hot water?
Yes. A water bath heats the part evenly, but it cannot go above 100 °C, so crystallization takes longer. 3D-Fuel notes that heat-treatable PLA needs extra time in a water bath for this reason.
Need a PLA Part That Survives Heat?
RunTechEngineer can advise whether annealing, a heat-treatable PLA, or a different filament suits your part, and print it with matching settings. Read about functional part printing and our design-for-3D-printing review, see our 3D printing services, or contact us with your model and the temperature it will see.